This web page is designed to provide a general understanding of the Kudo and Zoom platforms and their basic functionalities with which participants should familiarise themselves in order to attend Council of Europe online conferences.
As a participant, you can follow a meeting atand benefit from all the options available.
You will be able to request the floor to speak, share your screen, write on the messaging system and take part in votes.
Discover below the best practices and practical guides for both platforms.
The golden rules of online conferences :
Find a quiet placeWearing a headsetDesactivate notificationsOn computer : use Google CHROMEOn smartphone/tablet : download the applicationOn computer, smartphone/tablet : download the applicationRun tests before the event
Practical guides to using Kudo and Zoom :
Participant on a PC/MAC
Before the meeting
A few recommendations
Make sure that you are in a quiet place. Avoid noisy environments. Make sure your doors and windows are closed.
If several people are participating in the same videoconference and at the same location, make sure you are in a suitable room. Place the mic as close as possible to the speaker. Be careful not to generate any unwanted sound when your microphone is switched on.
Do not connect multiple computers without headset in the same room. The risk of acoustic shocks can be serious for all users.
Use a USB headset with your computer.
Close other applications that might produce notification sounds.
We strongy recommend using the browser Google Chrome (make sure you have the latest version). Allow to Google Chrome the access to your mic and camera. Click on the padlock in the address bar, then make sure your microphone is authorised:
Use a wired connection instead of WiFi if it's possible.
Take part in tests ahead of your meeting.
Test your microphone and camera. You will be able to record and listen to your voice to evaluate the audio quality. First click onthen scroll down to "Audio/video settings" to test your microphone and camera.
How to connect to Kudo
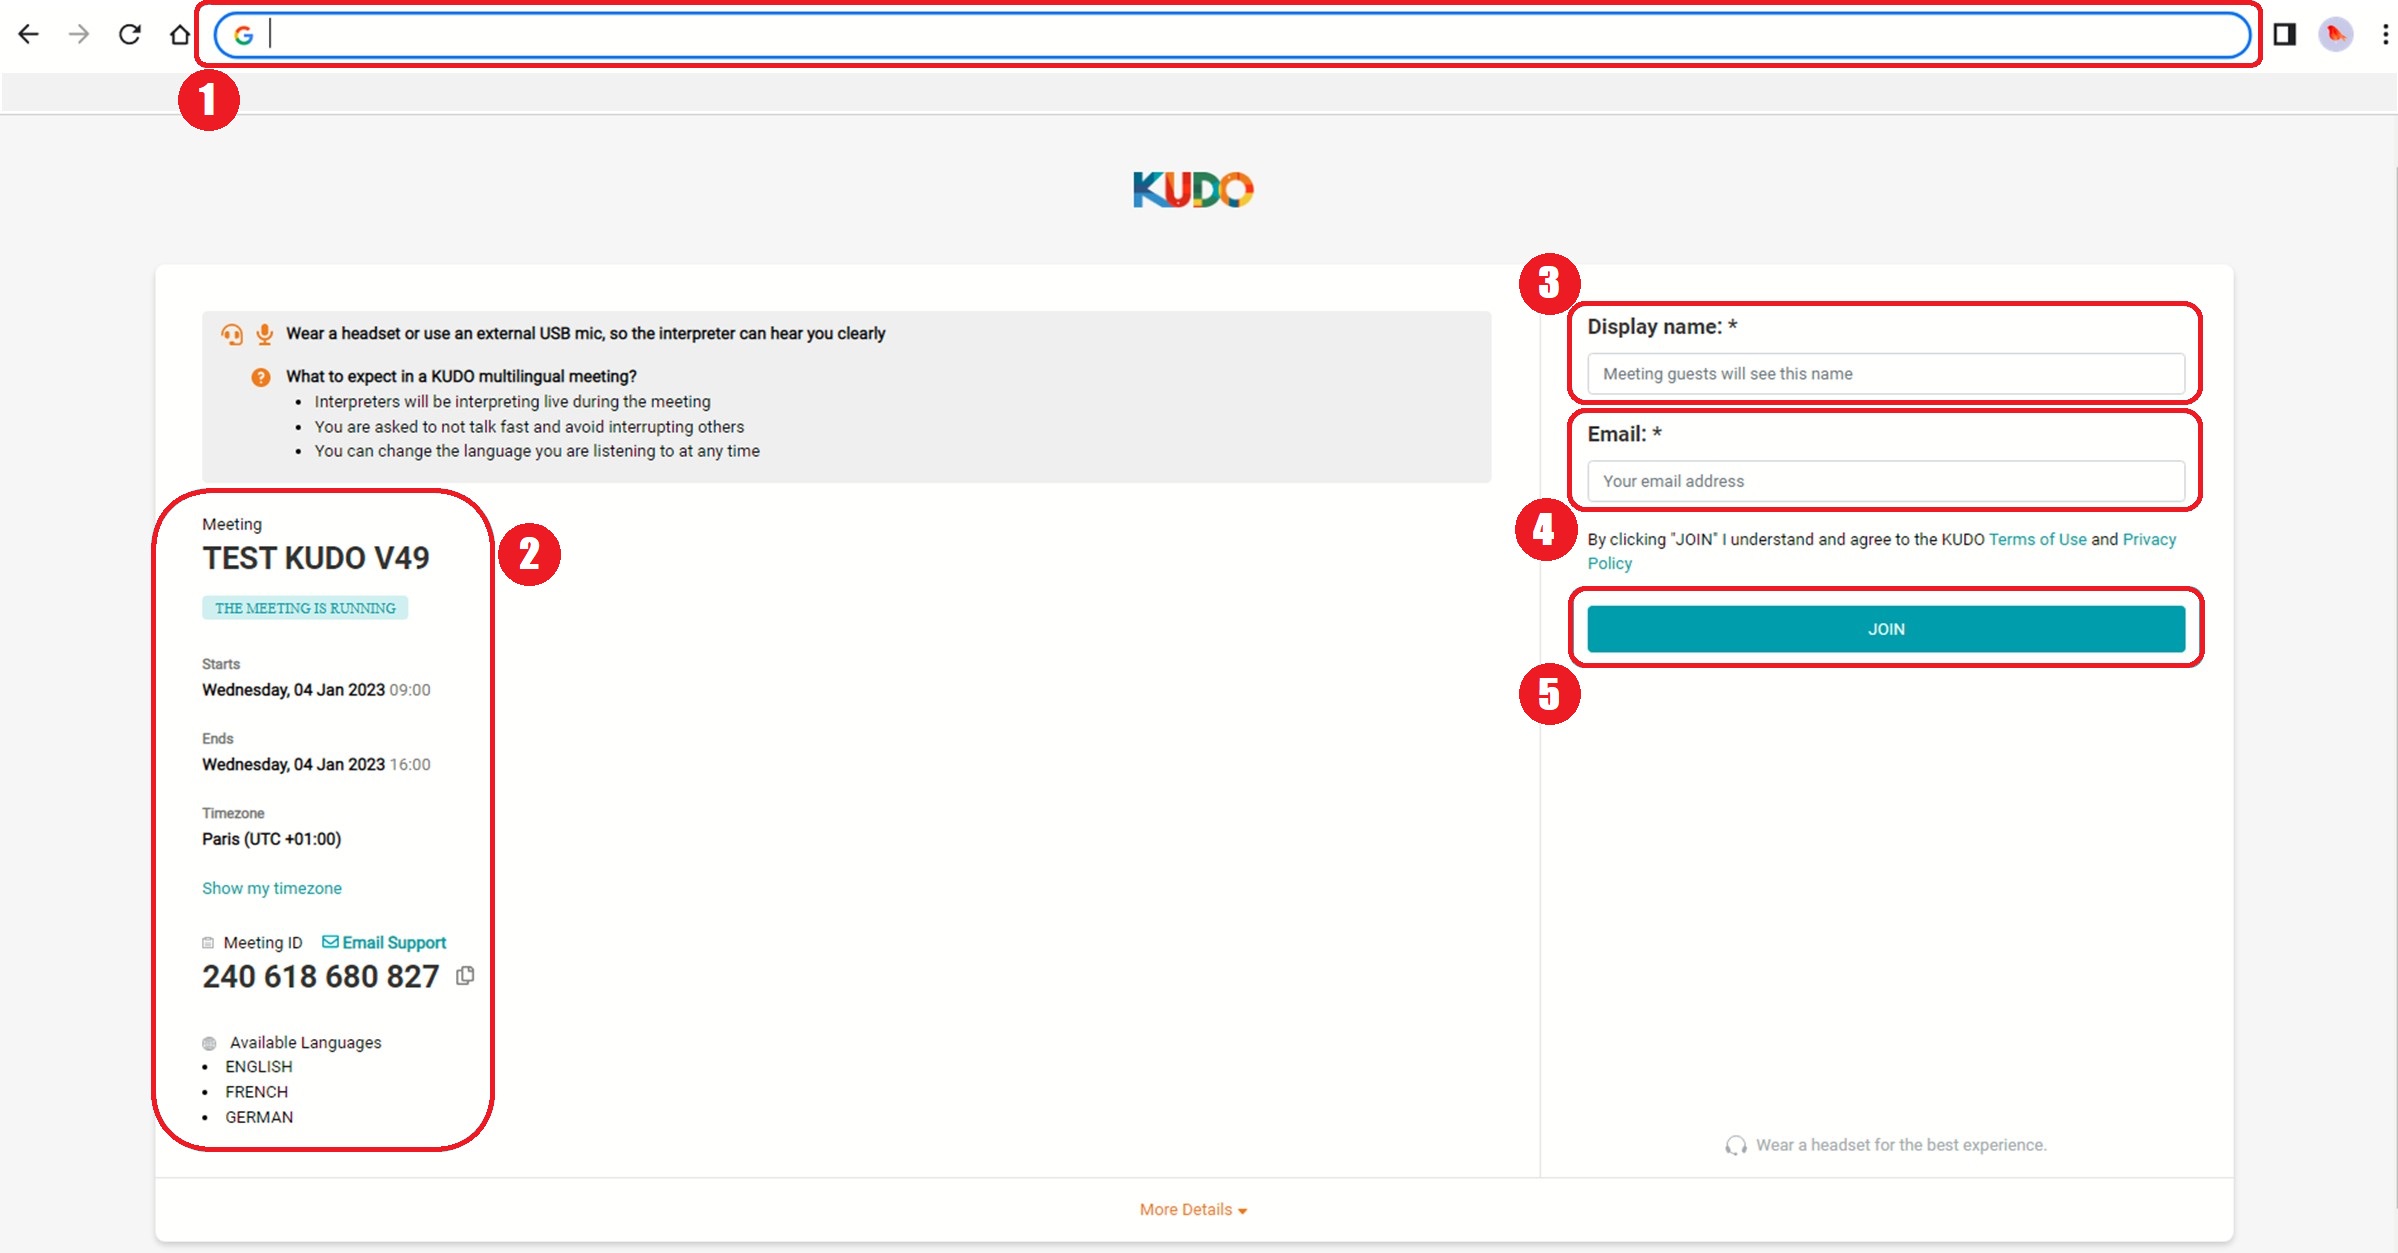
Connection to the Kudo meeting
1. Copy the link you received. Open Google Chrome and paste said link into the adress bar
2. You will find informations about your meeting (date, times, languages)
3. Enter your first and last name (and the country or the organisation you represent, if necessary). The "display name" is the name under which you will appear in the virtual meeting
4. Enter your email address IMPORTANT : if you have to vote during the meeting, make sure that this e-mail adress is the exact same as the one you communicated to your secretariat. The slightest mistake would make you unable to vote.
5. Click on "Join" when you have filled in the fields.
Optional : if you are connecting to a hybrid meeting with votes, you will have an additional choice to make between online or on-site
You are an online participant:
Select I'm an online participant. You will be able to follow the meeting with all its features.
If by mistake you selected "I'm an on-site participant", you will be in a restricted version of the meeting, unable to see or hear anything. To go back, click on "Log out" and reconnect with your name and e-mail to select I'm an online participant.
Setup your equipment
Setup and test your equipment before entering the meeting.
Follow each step before joining the meeting :
1. Access permissions for your equipment.
Make sure your microphone and camera are always allowed. There are also permissions for screen sharing and document uploading. Click on "Site Settings" to check all your permissions. 1bis. If a pop-up window "Vmeeting.coe.int wants to Use your microphone / Use your camera" opens, click "Allow".
2. Activate the microphone and camera on this screen to verify that your equipment is working properly.
A blue icon means your device is activated. A red icon means it is disabled. When you speak during your meeting, your camera and microphone will be automatically activated if you have already done so on this page. This will save you having to reactivate them each time you speak.
3. Open the drop-down menu in the "Microphone" section and check or select the device you connected.
Do not use the microphone of your computer, but a microphone suitable for videoconferencing, (e.g. headset with microphone connected via the USB port or the jack socket). Run your finger over the microphone you are using. If it is successfully connected you will see the blue sound bar moving. If the blue sound bar is not moving then your microphone is not properly connected or is not compatible.
4. Choose the language of the interface.
5. Once you have made sure that your equipment is working properly, click on "Join" to enter the virtual meeting.
How to use Kudo (general)
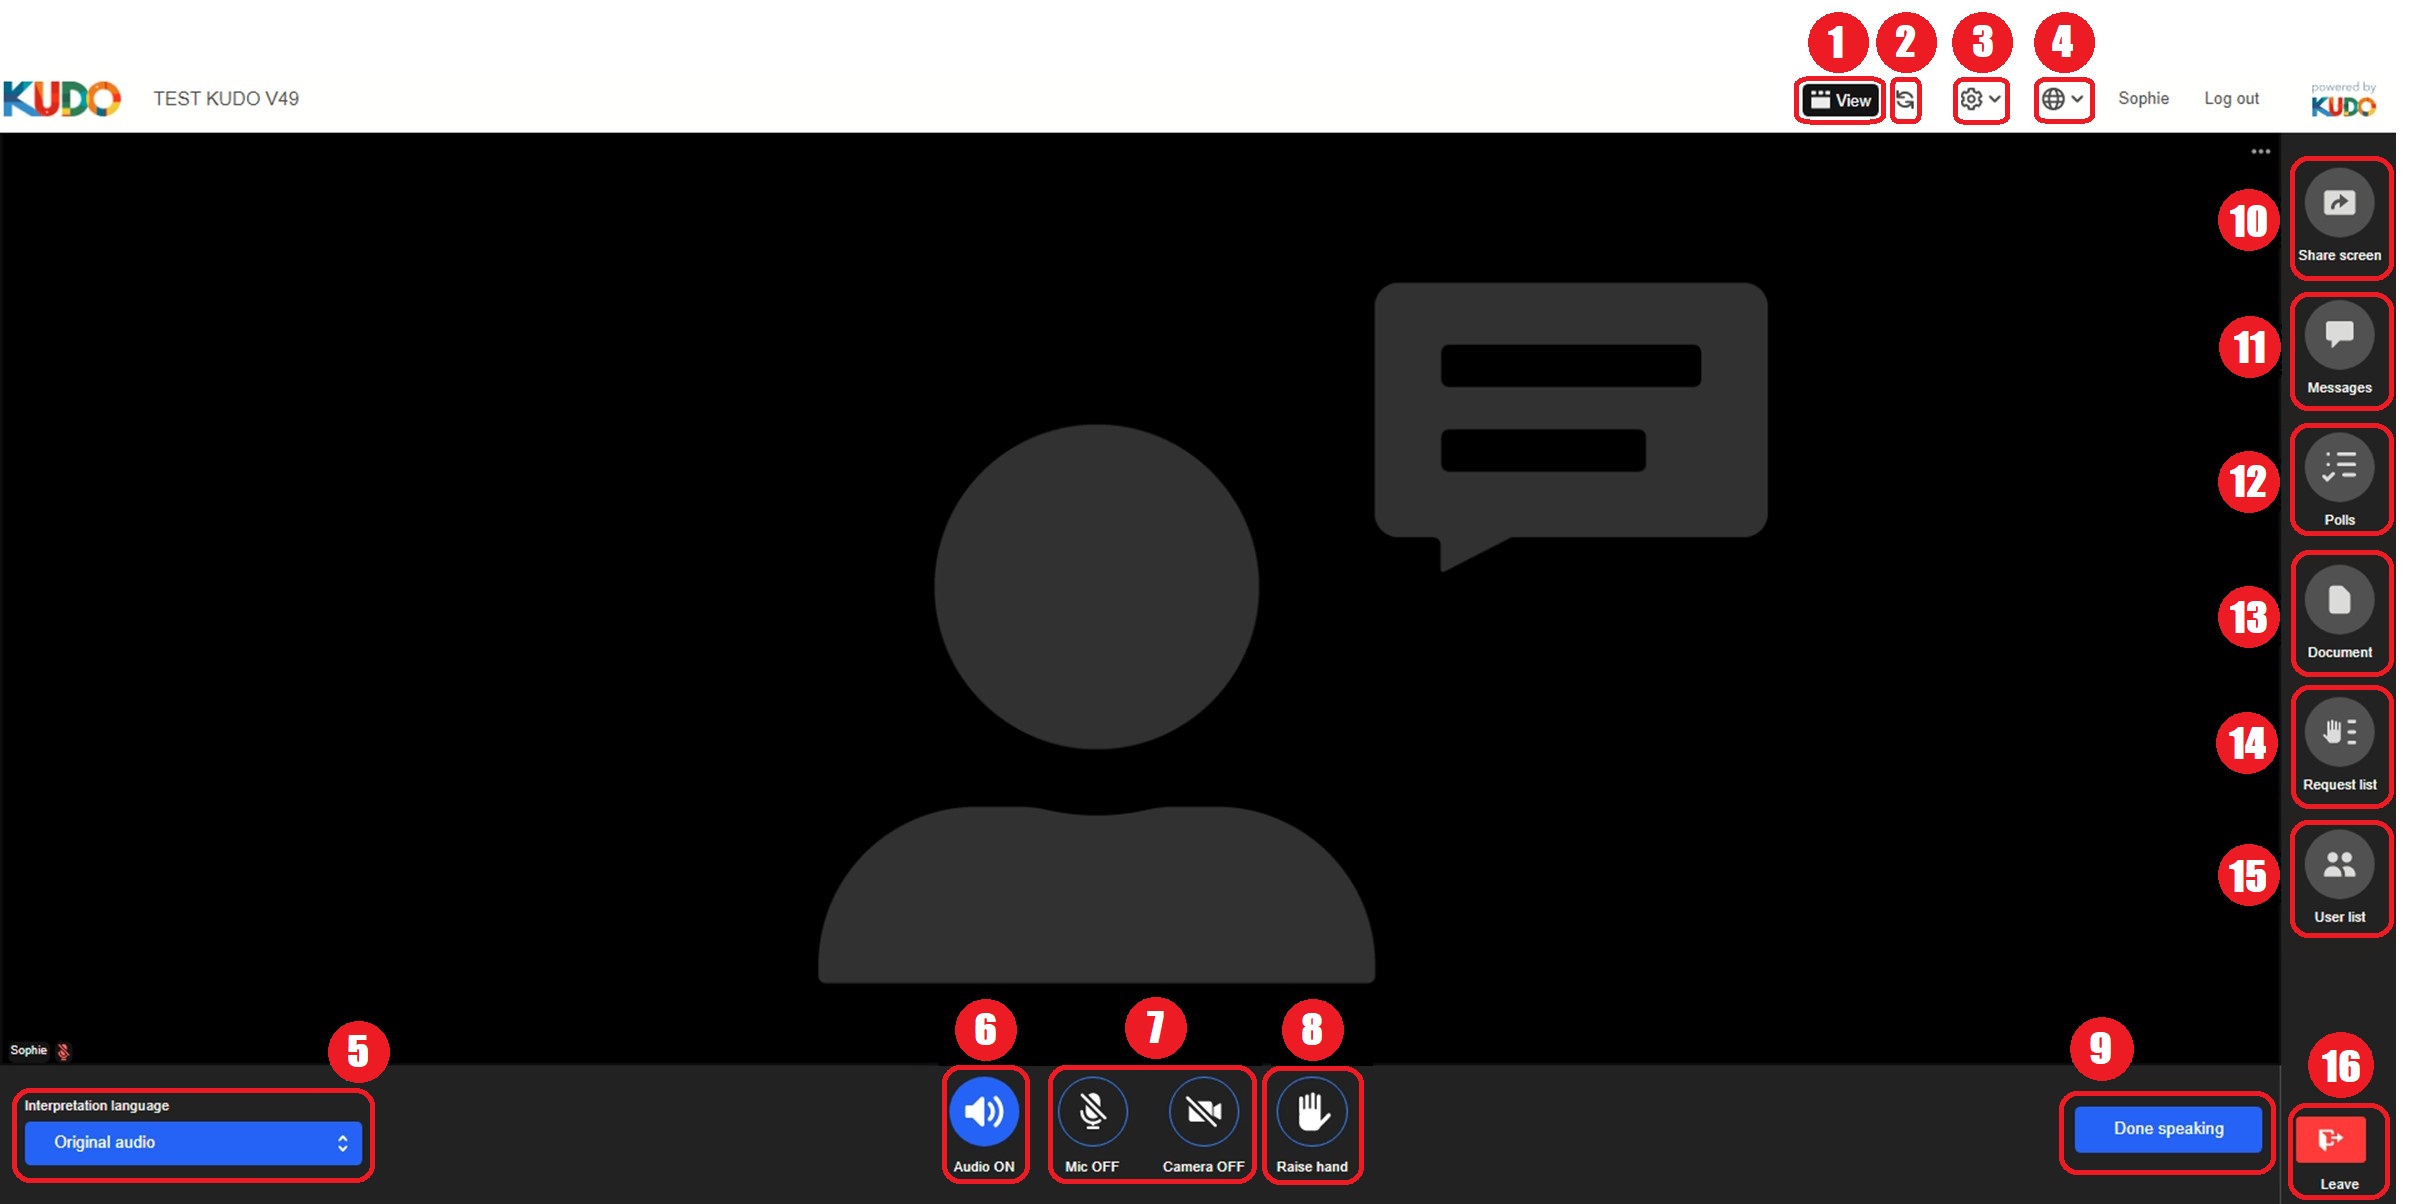
Different options on the participant page of Kudo
1. Video display, drop down menu. (feature only available on web applicationand not on Kudo Live)
Top: The active speaker is displayed in the main view. All the other on-screen participant thumbnails are displayed on the top.
Side : The active speaker is displayed in the main view. All the other on-screen particip ant thumbnails are displayed vertically on the left.
Speaker : Only the active speaker is displayed on the side with the presentation in the main view.
Presentation only : Only screen sharing.
Gallery : All on-screen participants' thumbnails and screen sharing if there is are displayed and distributed across the screen.
Full screen : Full screen of the video display.
2.Refresh your web page
3.Media settings: Verify your settings of your mic and camera.
4.Choose the language of the interface.
5.Listen to the speaker or the interpreting. Click to open the drop-down menu and choose the language you want to listen to.
6. Turn on/mute audio.
7.Turn on your microphone and camera.
8.Raise Hand (feature only available on web applicationand not on Kudo Live)
When you are active (already accepted), click raise your hand to visually indicate that you want to intervene. If more than one participant raises their hand, the names appear in chronological order. The places of the vignettes follow also the chronological order.
User List: when a participant raises their hand, a notification appears next to their name.
9. Request to speak / cancel (if necessary)/ done speaking. 3 steps for this button :
13. Documents. Download the documents uploaded for the meeting.
14. Request List. View your position in the speaker’s list. The order is chronological.
15. User List. You can see who is connected to the meeting.
16. Leave the meeting. Allows you to leave the session.
As long as the meeting is not closed, you can reconnect to the meeting anytime.
How to vote
How to vote on Kudo ?
How to submit your vote?
Voting is accessible from the "Polls" button.
Wait for the chairperson to open the vote. Once it's open you can see it in the Polls tab. As long as the vote is not open, you will not see anything in the Polls menu, this is normal.
Depending on your internet speed, there may be a bit of latency.
Choose your answer(s) and then click on Submit. This is very important, if you don't click on Submit, your vote will not be taken in account.
Once the vote is closed, the results will be visible in the Results tab.
When a vote is started or published, a red dot appears next to the "Polls" button.
Polls tabResults tab
Important note: For each vote below, parliamentary votes (nominative and secret) and multiple-choice votes,once you have submitted your answer, you will not be able to change it.
Types of votes :
Parliamentary votes (nominative):
Select your answer (YES - NO - ABSTAIN)
Click on the blue button "Submit" to validate your vote.
The result is not anonymous.
Parliamentary vote (secret):
Select your answer (YES - NO - ABSTAIN).
Click on the blue button "Submit" to validate your vote.
The result is not anonymous.
Multiple choices vote:
You can select one or more answers..
The total number of answers is visible below the question.
Click on "Send" to validate your vote.
The result is not anonymous.
Meeting with voting rights (optional)
Meetings with voting rights need to follow a few steps.
Make sure you join the meeting by naming yourself correctly and using the exact email address that you have provided to the secretariat. Only this email address gives you the right to vote. If you use another email address or make a mistake while typing your email address, the system will not recognise you and you will not be able to vote.
If this message appears during the vote, log out and open a new session with the correct e-mail address. As long as the vote is not closed, you will be able to vote.
How to share your screen
Only possible from a computer
How to share the screen on Kudo Only possible from a computer.
To share a presentation, first you have to request for the floor.
Click on the Request to speak button and wait for the moderator to accept you.
Prepare your document so that it is already open.
Once you are accepted on the floor, you are now able to share your screen.
You can click on this icon in the top right corner of your page.
3 types of sharing are available : Click on the visual you want to share and then click on "Share".
How to stop sharing : If you are looking at your powerpoint in full screen, press the Esc key on your keyboard and close your document.
Then return to the Kudo page and click on Stop sharing.
The Stop sharing button is located at the same place as when you clicked on Share screen in the beginning.
Please note:
Other participants have different options of display, as you can see below:
The other participants have different choices for viewing their screen, as you can see below:
Top: The active speaker is displayed in the main view. All the other on-screen participant thumbnails are displayed on the top.
Side : The active speaker is displayed in the main view. All the other on-screen participant thumbnails are displayed vertically on the left.
Speaker : Only the active speaker is displayed on the side with the presentation in the main view.
Presentation only : Only the shared presentation is displayed.
Gallery : All on-screen participants' thumbnails and presentation (if there is one) are displayed and distributed across the screen.
Full screen : Full screen of Kudo without any buttons or interface.
ff
Participant on iOS / Android
Before the meeting
A few recommendations
Download the Kudo Live application when you are using a smartphone or tablet. You can find the application on the Google Play Store for Android, or the App Store for Apple devices.
Once the app is installed, simply click on the participant link sent by e-mail. The app opens automatically. Do not use a browser, it won't work properly.
Ensure you are in a quiet place. Avoid noisy environments. Make sure your doors and windows are closed.
If several people are participating in the same videoconference and at the same location, make sure you are in a suitable room. Place the mic as close as possible to the speaker. Be careful not to generate any unwanted sound when your microphone is switched on.
Do not connect multiple smartphones/tablets without earphones in the same room. The risk of acoustic shocks can be serious for all users.
Use headphones with a built-in microphone.
Turn off your notifications and put your smartphone in silence mode.
Use the best connection available : if your Wi-Fi is not strong enough, try to use your 4G/5G instead.
Take part in tests ahead of your meeting.
Test your microphone and camera. You will be able to record and listen to your voice to evaluate the audio quality. First click on then scroll down to "Audio/Video settings" to test your microphone and camera.
How to connect to Kudo
Connect to a Kudo meeting
Method 1 :
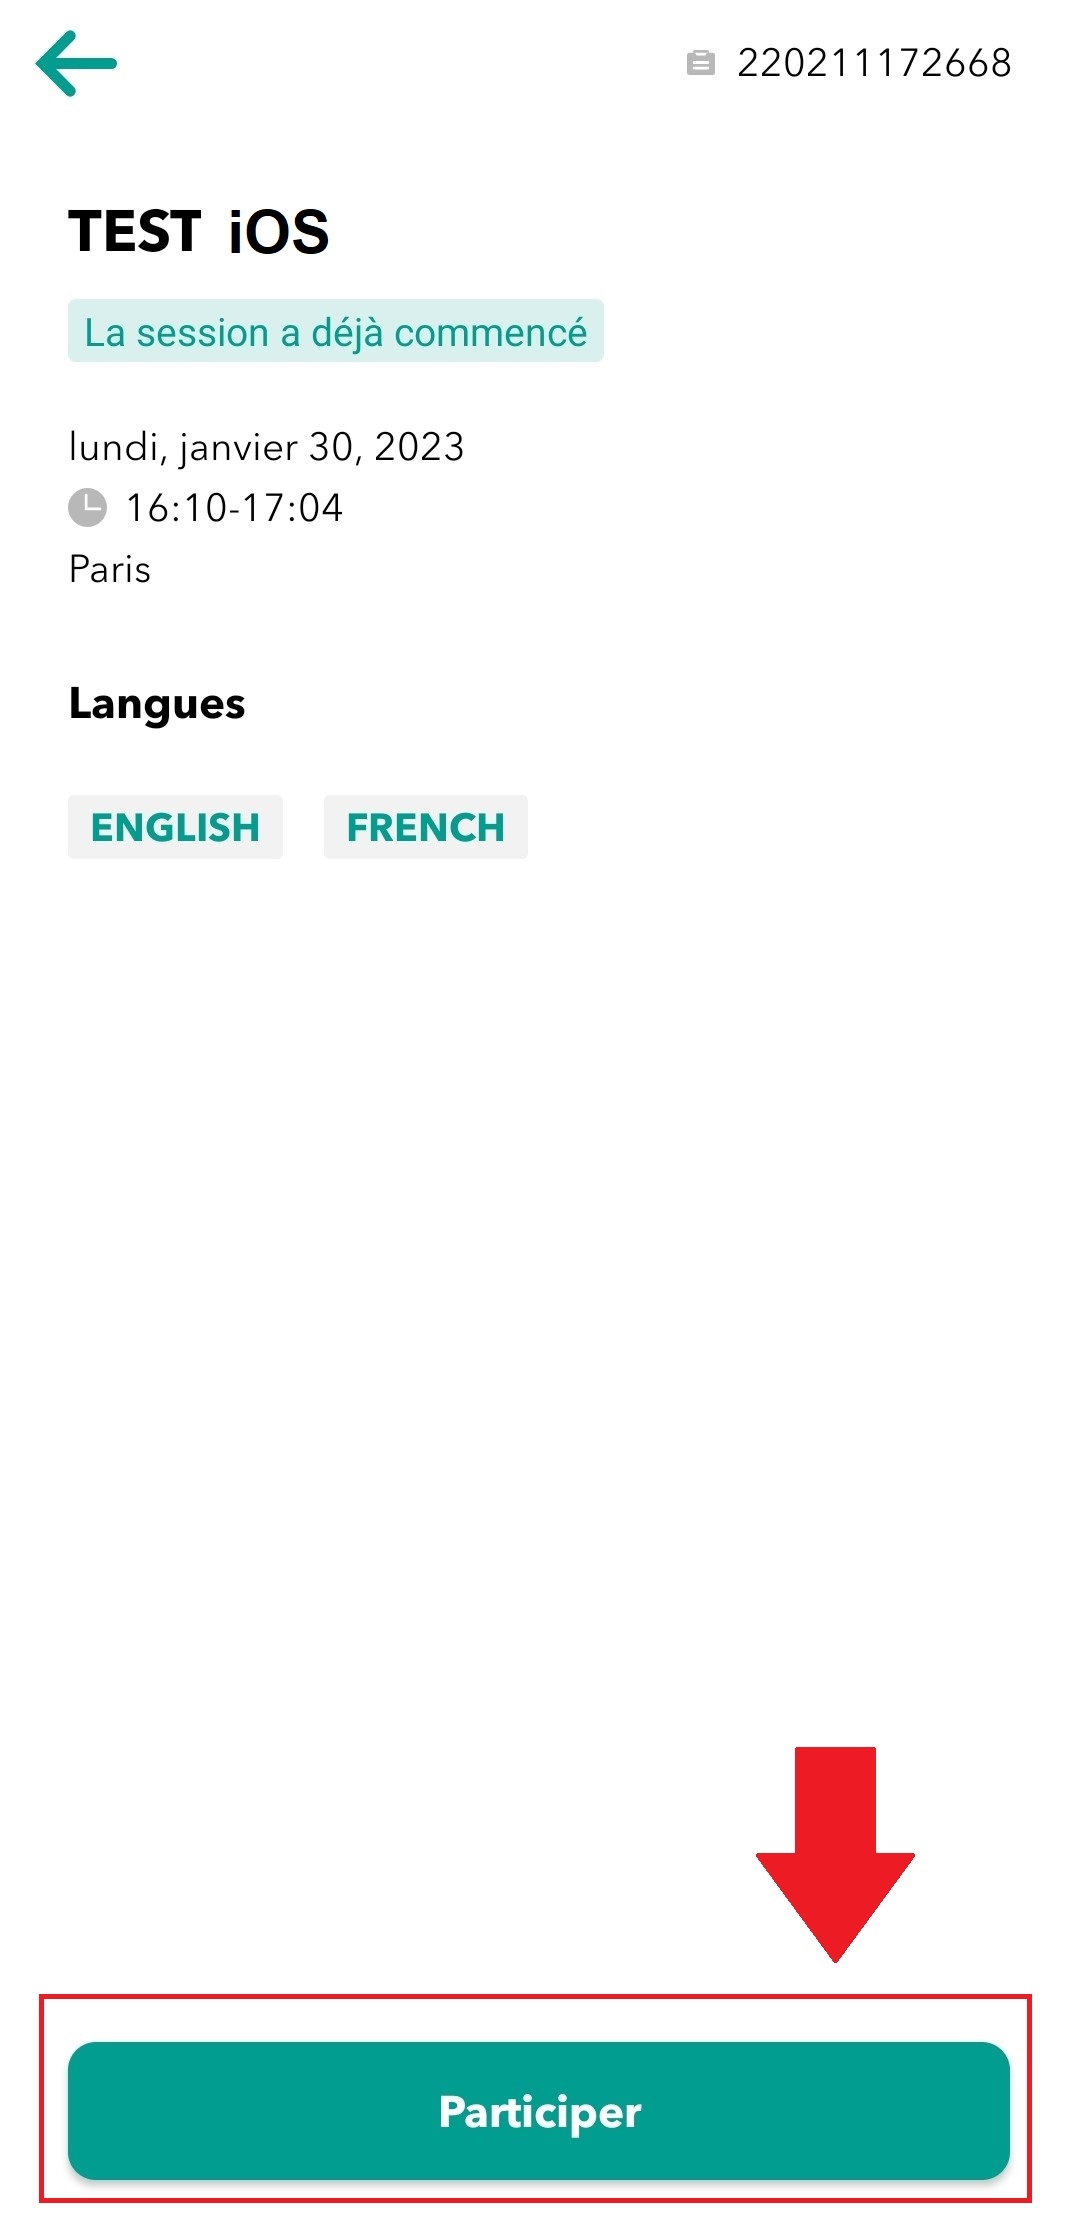
If you have the KUDO LIVE app installed on your device, simply tap the meeting link that you received by e-mail for example
The KUDO LIVE app will automatically open with the meeting informations (date, time and interpreted languages)
Tap Join at the bottom of the screen
On the next screen :
1. Enter your name and e-mail IMPORTANT : if you have to vote during the meeting, make sure that this e-mail adress is the exact same as the one you communicated to your secretariat. The slightest mistake would make you unable to vote.
2. Tap Join to enter the meeting
Optionnal : if you are connecting to a hybrid meeting with votes, you will have an additional choice to make between online or on-site :
You are an online participant:
Select I'm an online participant. You will be able to follow the meeting with all its features.
If by mistake you selected "I'm an on-site participant", you will be in a restricted version of the meeting, unable to see or hear anything. To go back, click on "Leave" and reconnect with your name and e-mail to select "I am an online participant".
Method 2 :
Open the Kudo Live application
Tap “Join with Meeting ID”
Enter the meeting ID The Meeting ID is the 12 digits contained in the link that you received.
For example with :
The Meeting ID for this meeting would be 241114743924 .
Tap "Verify"
The app will now display the meeting informations. (The next steps are similar to Method 1).
How to use Kudo on iOS and Android
Different options of the participant screen on Kudo (mobile)
1. Request to speak. Wait until the moderator accept your request
2. Choose between languages channels or the original audio
3. Access to the votes
4. Access to the chat with other participants
5. Download all the documents of your meeting
6. Check the request list to see who is asking for the floor
7."Plus": the settings and users button. You can see the attendees connected on Kudo and cut off the sound/video
8.Leave the session
Please note that on Kudo Live app:
You can’t do any sharescreen
You can't have the host status
"Plus"
Allows you to see who is connected to the meeting through the “Users” sub-menu
Allows you to mute sound and video from the platform
You can disable the sound of the platform to avoid acoustic shock from the echo
How to vote on Kudo with iOS and Android
Vote on app
In the "Polls" tab:
Choose your answer and click on submit
Wait until the vote is closed. You see this message meaning "waiting for the results"
In the "Results tab:
Check the results
Participant on a PC/MAC
Before the meeting
A few recommendations
Make sure that you are in a quiet place. Avoid noisy environments. Make sure your doors and windows are closed.
If several people are participating in the same videoconference and at the same location, make sure you are in a suitable room. Place the mic as close as possible to the speaker. Be careful not to generate any unwanted sound when your microphone is switched on.
Do not connect multiple computers without headset in the same room. The risk of acoustic shocks can be serious for all users.
Use a USB headset with your computer.
Close other applications that might produce notification sounds.
We strongly recommend using the application Zoom for desktop.
How to connect to Zoom Via browser or desktop application
Example of an invitation to join a Zoom meeting:
Council of Europe invites you to a scheduled meeting Zoom. Subject : Réunion zoom / Zoom meeting Date : 8 febr. 2023 02:00 PM Paris
To join the meeting Zoom https://coe-int.zoom.us/j/8689178XXXX?pwd=SjhsQmoxMyt1b0xONldHcHdYaGVPUT09 Meeting ID : 868 9178 XXXX Passcode : XXXXX
Note that the number in the link is exactly the same as the meeting ID. This is because there are 2 ways to connect to Zoom:
Method 1:
Copy-paste the link in your Internet browser
1. Copy the link you received. Open Google Chrome and paste said link into the adress bar.
2.Allow Zoom to use your microphone and camera.
3. Enter your name (visible to everyone on Zoom).
4.Optional: check to make Zoom remember your name for a future Zoom connection.
5. Select the microphone and camera that will be used by Zoom .
6.Join the meeting.
Method 2:
Enter the meeting ID in the Zoom application
Open the Zoom application and click “Join a meeting”
1. Enter the meeting ID present in the invitation
2. Enter your name
3. Click on “Join”
1. You are then prompted to enter the passcode received in the Zoom invitation
2. Click on “Join Meeting”
How to use Zoom (general)
Different options on the participant page of Zoom
1.View - Allows to choose different ways of displaying the participants:
Speaker: Enlarges the image of the person speaking and diminishes the others.
Galerie: Puts all the participants' thumbnails at the same size.
Show self view: Shows/hides your own camera.
Show non-video participants: Shows/hides, on screen, people with camera turned off.
Fullscreen: Brings the Zoom interface to full screen.
4. Use messaging with all the participants or individually.
5.Share a presentation on screen for everyone.
6.Leave the meeting (you can log back in as while the meeting is still in progress).
How to use the messaging
How to chat on Zoom
Click the Participants and Chat icons at the bottom of your screen to open these windows in a large way.
In the Participants window you can see who is connected. You can turn your microphone on/off by clicking on the microphone icon next to your name.
In the MeetingChat window you can choose between:
Write to all participants.
Write privately to any of them.
The blue button Everyone lets you scroll down the menu to see the names of the other participants and select one to write to.
How to share your screen
Only possible from a computer
How to share the screen on Zoom Only possible from a computer.
To share a presentation, you should first open your document so that it is ready to share.
Then go back to Zoom and click on the button at the bottom of the screen.
You will see the following window :
1. Make sure you are on the “Basic” tab.
2. Choose “Screen” from the different solutions.
3. Click on “Share”
From now on, what you see on your screen is what you share to other participants.
4.Then go to your document to share it so that everyone can follow it on-screen.
ff
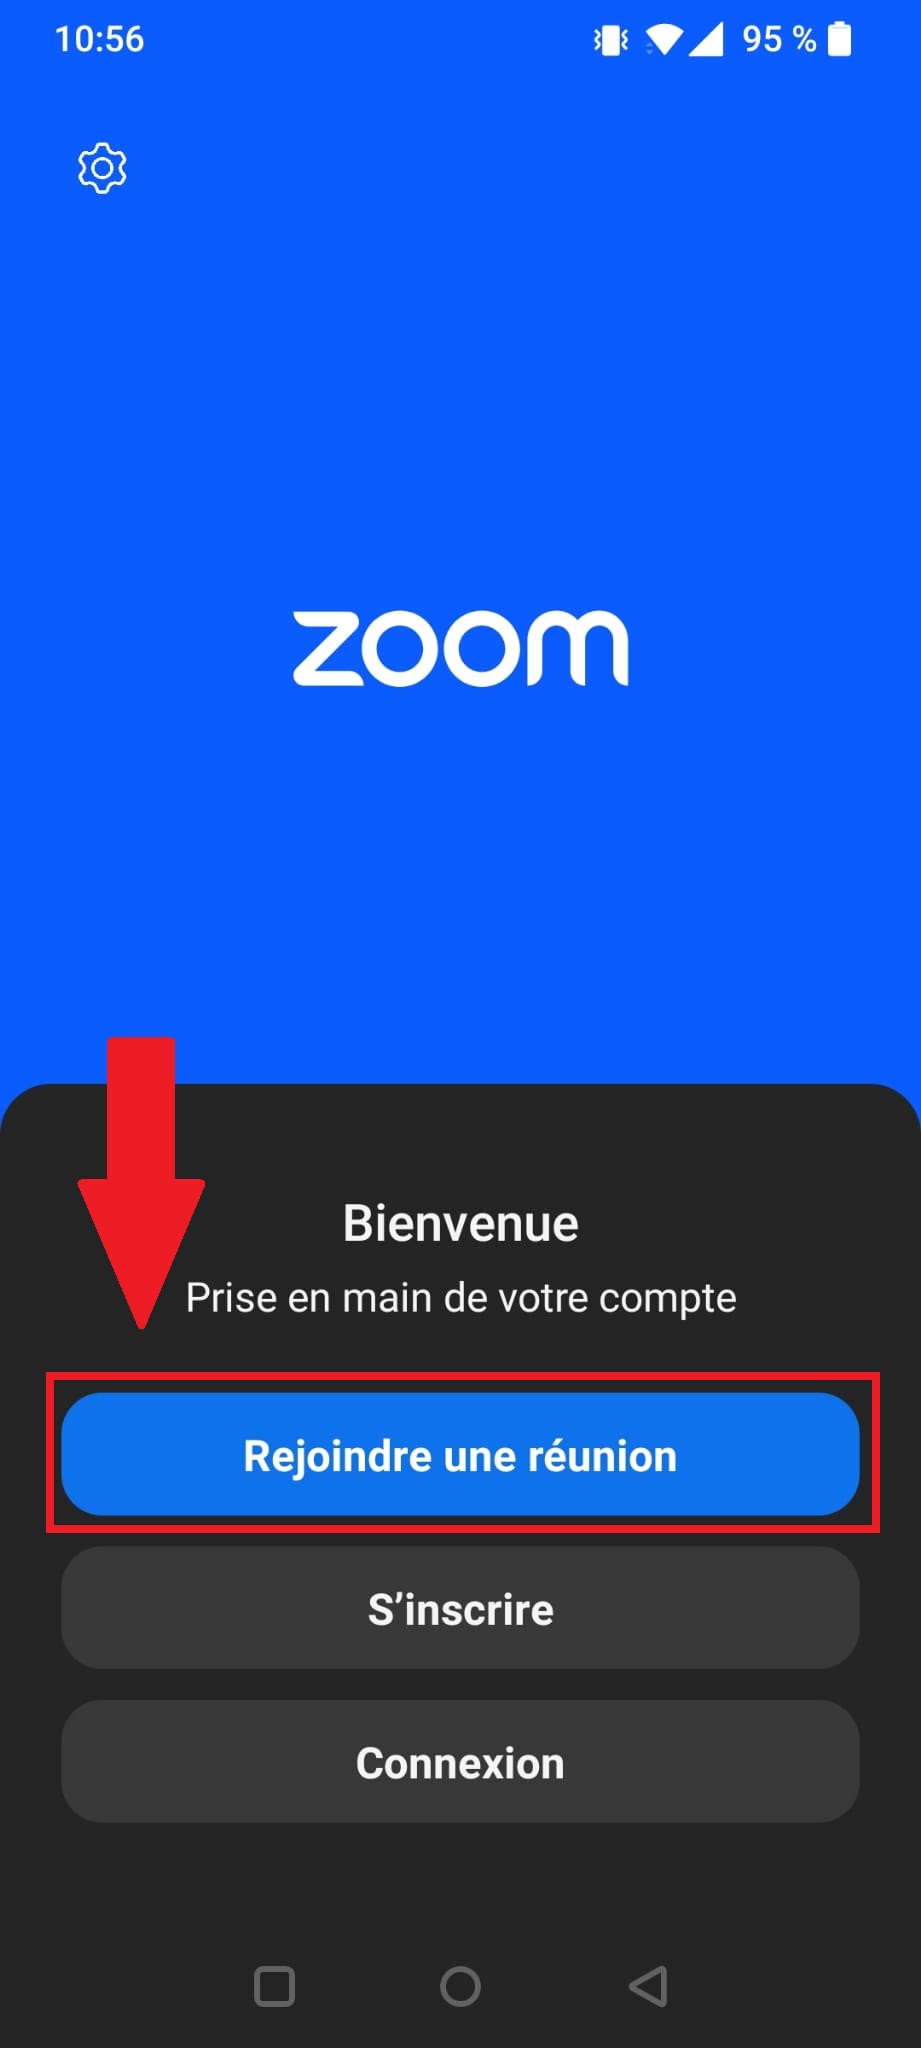
Participant on iOS/Android
Before the meeting
A few recommendations
Download the Zoom application when you are using a smartphone or tablet. You can find the application on the Google Play Store for Android, or the App Store for Apple devices.
Once the app is installed, simply click on the participant link sent by e-mail. The app opens automatically.
Ensure you are in a quiet place. Avoid noisy environments. Make sure your doors and windows are closed.
If several people are participating in the same videoconference and at the same location, make sure you are in a suitable room. Place the mic as close as possible to the speaker. Be careful not to generate any unwanted sound when your microphone is switched on.
Do not connect multiple smartphones/tablets without earphones in the same room. The risk of acoustic shocks can be serious for all users.
Use headphones with a built-in microphone.
Turn off your notifications and put your smartphone in silence mode.
Use the best connection available : if your Wi-Fi is not strong enough, try to use your 4G/5G instead.
Take part in tests ahead of your meeting.
Test your microphone and camera. You will join a "test meeting" where you can simply follow the instructions to make sure that you device is working properly.
How to connect to Zoom
Connect to a Zoom meeting
Method 1 :
If you have the ZOOM app installed on your device, simply tap the meeting link that you received by e-mail for example
The ZOOM app will automatically open and connect to your meeting
Method 2 :
Open the ZOOM application
Tap “Join a meeting”
On the next screen :
1. Enter the Meeting IDThe Meeting ID consists in 11 digits contained in the link that you received. Usually it is also communicated to you under this form :
Meeting ID : XXX XXXX XXXX
Passcode : XXXXXXX
2. Enter the Passcode The passcode will be communicated to you (if relevant) under this form :
Meeting ID : XXX XXXX XXXX
Passcode : XXXXXX
Please note that the passcode is not needed if you directly click on the link (see Method 1), as the passcode is "included" in the link.
3. Choose if you want to
Not connect to the audio when entering the meeting (it is recommended to untick this box)
Stop my video when entering the meeting (it is recommended to tick this box)
4. Tap "Join"
You will now be connected to the meeting
How to use Zoom on iOS and Android
Different options of the participant screen on the Zoom mobile app
When you join the meeting, you are asked to choose a way to connect to the audio. Select "Wifi or Cellular Data""2
If the prompt disappeared, click on "Join Audio"1 then "Wifi or Cellular Data"2
The next screen is the main interface of the meeting :
1. This is your main bar where you will find all the controls for the meeting.
You can swipe it left to see more options (see below for a detailed explanation of every button).
2. Tap this button to see the meeting informations (Meeting ID, Passcode, etc...)
3. Tap this button to leave the meeting.
Description of the buttons :
Use this button to mute/unmute your microphone.
Use this button to turn your camera on and off.
Use this button to access the list of participants currently connected to the meeting.
Use this button to open the chat. You can chat with everyone or send private messages to other participants.
Use this button to send a reaction to everyone in the meeting. You can also raise your hand to notify that you want to take the floor.
Use this button to share your screen to everyone in the meeting. Tap the button then select "Screen".
Use this button to create and show a whiteboard to everyone in the meeting. You can draw on it and give other people permissions to do it as well.
Use this button to access your settings and interpretation (if available). See below for more details.
Settings :
Here you can change a few settings in your app. The most useful are :
Show Non-Video Participants : allow or not the display of the participants who have turned off their camera. It is recommended to untick this option to have a clearer view of the meeting.
Stop incoming video : if your connection is bad, you can tick this option to disable incoming video, therefore you will save some bandwith and improve the quality of the audio you send and receive.
Interpretation :
If the interpretation is available in the meeting, tap and select . You will then be able to choose wether you want to listen to the original audio of the meeting, or if you want to listen to an interpretation channel.

 The golden rules of online conferences :
  Practical guides to using Kudo and Zoom :


 Description of the buttons :


